Friday, May 22, 2020

15 Hidden Android Features You Should Know

While Android has matured by leaps and bounds, it's still going through the refinement phase. Over time, Google has both added and removed many popular features in Android. Sometimes the features are completely removed. However, in many cases, they make it to the Settings page or they are buried under different hidden places inside Android. That's why we have come up with this article where we unearth 15 hidden Android features that are quite interesting and helpful. So, let's go ahead and explore some unique Android features which are available on our Android devices.


Hidden Android Features

Here, we have mentioned several hidden Android features ranging from privacy, security, ease of use and more. Further, we have also added some obscure Android features which were released recently but might have gone under the radar. Now with that said, here are the hidden Android features that you should know and use often.

1. Block Spam Calls

The one feature that I turn on whenever I set up a new Android device is: filter spam calls. It saves me from unwanted calls by telemarketers, fraudsters and spammers. If you use a stock Android device, you must have the Phone app by Google installed as your default dialer. To enable spam call blocking, open the Phone app and tap on the three-dot menu on the top-right corner and open Settings. After that, open "Caller ID and spam" and enable both the toggles. Now, whenever you will receive a call by spammers, the screen won't light up or make any sound. It's almost like DND with Total Silence turned on.
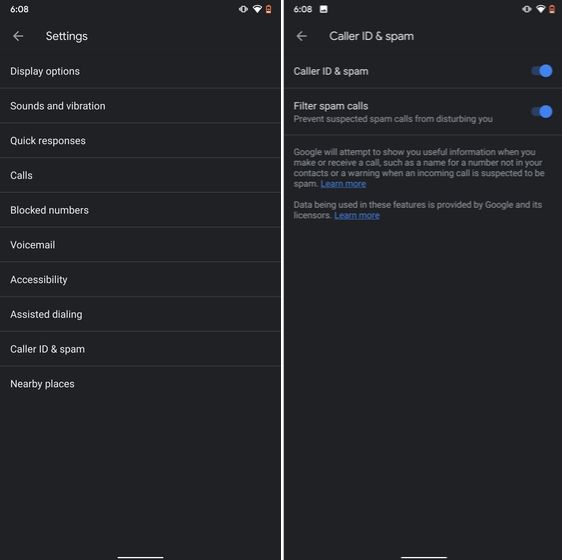
1. Block Spam Calls hidden android features

If you are worried that you will miss important calls then fret not. I have been using this feature for a long time and I can vouch that it works flawlessly. While there are other apps like Truecaller with similar features, you should be wary against handing your data to third-party apps, especially given its shady past record.

2. Verification Code Autofill

Many of us have allowed SMS permission to multiple apps for seamless OTP verification. However, this can lead to serious breach as apps can read all your text messages and also build credit profile without your consent. To crack down on this behavior, Google has brought a new API called the SMS Retriever. It allows apps to capture a one-time code without asking for SMS permission. In case, the app developer has not implemented this API, Google will act as a bridge and provide the verification code. That is awesome, right? So to enable this feature, navigate to Settings -> Google -> Verification Code Autofill and enable the toggle. Make sure you have also enabled the Autofill service by Google.
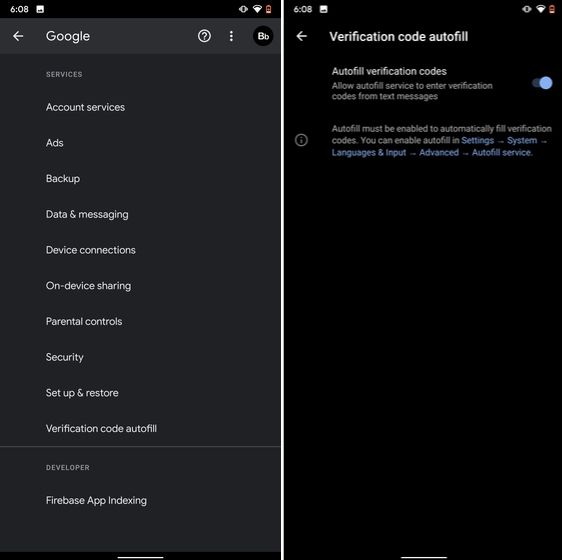
2. Verification Code Autofill

3. Force Dark Mode on all Apps

While the dark mode is slowly becoming the norm, there are still apps like Facebook and WhatsApp which are yet to embrace the dark side. If you want to force dark mode on a range of apps then there is a hidden Android setting that lets you do it. However, you must be on the latest Android 10 build. To enable dark mode for all the apps, navigate to Settings -> About Phone and tap on the Build Number for seven times continuously. A toast notification will show up prompting "Developer Options have been enabled". Now go back, and search for "Override force-dark" in the Settings page. Tap on the first result and then enable the toggle. Just to be sure, restart your device and check if dark mode is working on all apps.
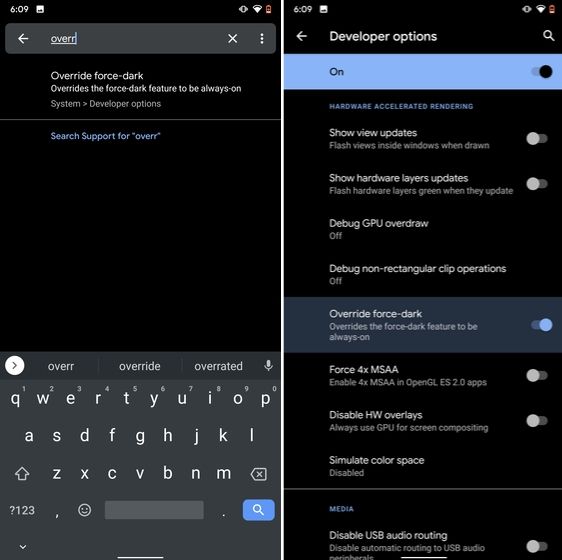
3. Force Dark Mode on all Apps

4. Focus Mode

Google has brought a new feature called Focus Mode to Digital Wellbeing with the launch of Android 10. While Digital Wellbeing is great at limiting the screen time of various apps, Focus Mode allows you to block certain apps completely so you can focus on what you are doing. To configure Focus Mode, follow Settings -> Digital Wellbeing -> Focus Mode. Here, you can select apps that you find distracting and can enable Focus Mode straight from the Quick Settings panel.
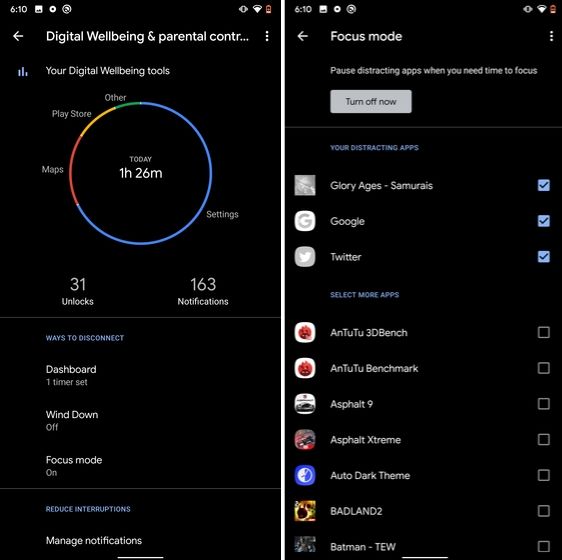
4. Focus Mode hidden android features

5. Share WiFi with QR Code

I know the feeling when someone asks you to share your WiFi's password and you can't seem to remember it. If you use a strong password with multiple hashes and characters then it becomes even more tedious to type it out. In such cases, a QR code can help you seamlessly connect to WiFi networks. Thankfully, Android 10 has this not-so-hidden feature under the WiFi Settings page. Open it and you will find the QR code scanner besides the "Add Network" section. Now, scan the QR code and you will be connected in no time.
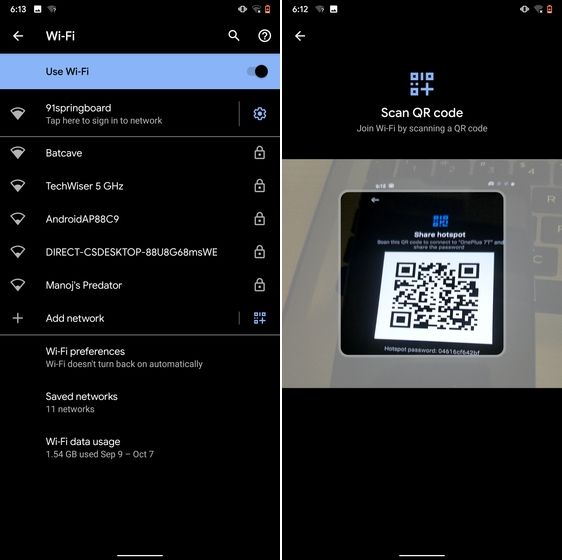
5. Share WiFi with QR Code

6. Randomize MAC Address

MAC address is a unique identifier assigned to WiFi-enabled devices including smartphones. Most devices come with a static MAC which can be exploited and used for tracking user movement. So having a random MAC address reduces the chance of tracking and strengthens your privacy. If you are running Android 10 then you can randomize the MAC address from the WiFi Settings page. Tap on the WiFi that you are connected to and open "Privacy". Here, make sure "Use randomized MAC" is your default pick.
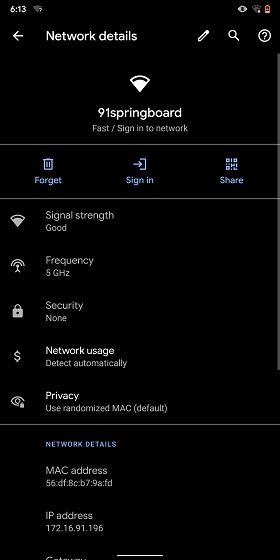
6. Randomize MAC Address

7. Force Apps to Resize in Split Mode

Android has some unique features like Split Mode which make it quite distinct from iOS. It lets you run two apps at once so you can effortlessly multitask between them. However, not all apps support Split Mode and that's where this hidden Android feature comes into play. With this feature, you can force any app to resize in split mode, irrespective of the app compatibility. So to enable this feature, open Settings and search for "resizable". Open the first result and enable "Force activities to be resizable". Now, restart your device and you can enjoy any app in the Split mode.
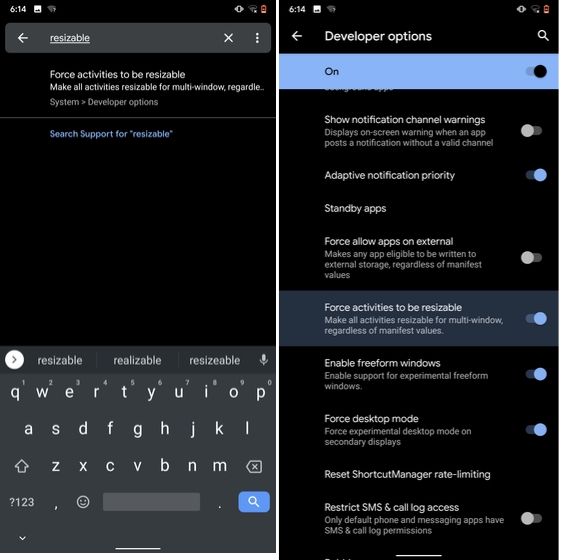
7. Force Apps to Resize in Split Mode

8. Default USB Configuration

If you are someone who regularly connects Android devices to PC then this sneaky feature is going to help you a lot. Android 10 now allows you to choose your default USB configuration. If you transfer files regularly then simply choose the desired settings and you are good to go. To configure USB, open Settings and search for "Default USB" and tap on the first result. Here, choose "File transfer" or any other settings based on your preference.
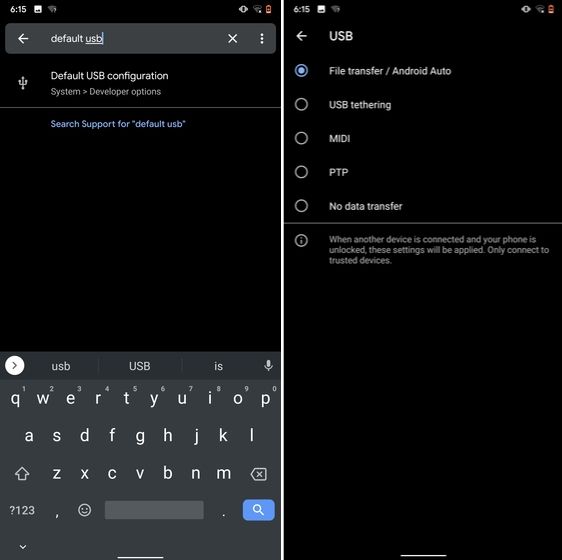
8. Default USB Configuration (2) hidden android features

9. Private DNS

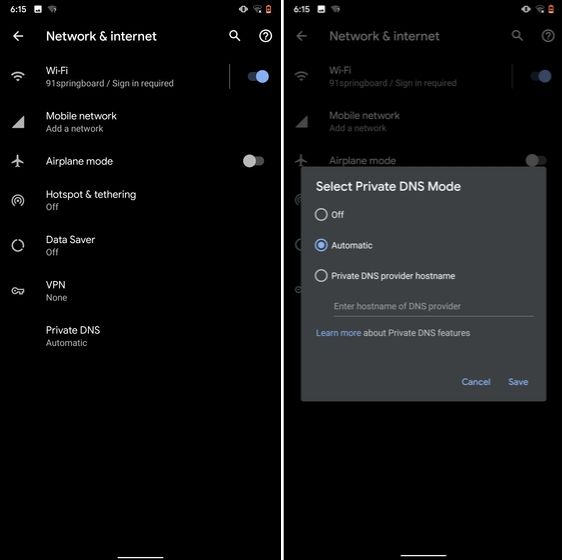
While Private DNS was launched with Android Pie, it still remains one of the least talked features of Android. It allows you to encrypt your DNS query so no one can read it, not even your internet service provider. You can find the Private DNS feature in the "Network and Internet" settings page. Here, open "Private DNS" and choose Automatic for Google's DNS or you can also select some other DNS providers as well. I would recommend you to go with Cloudflare's DNS.
9. Private DNS

10. Device Theming

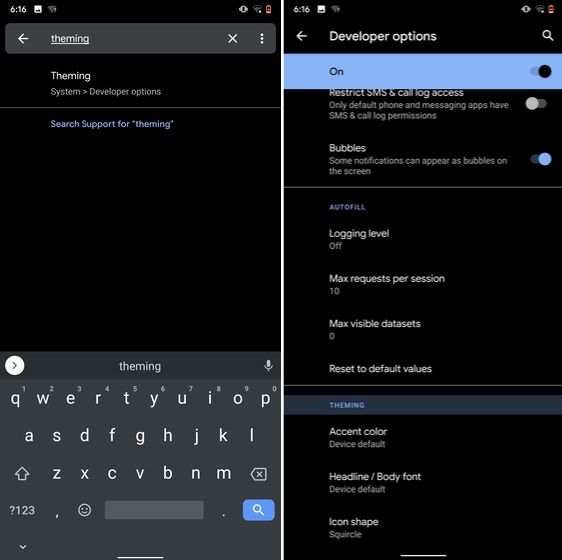
Device theming has finally arrived on Android, but it's still hidden under the developer options. You can change the accent color, font and icon shape from a handful of options. To find the desired settings page, open Settings and search for "theming". Tap on the top result and customize your Android device as you prefer.
10. Device Theming

11. Show Taps While Screen Recording

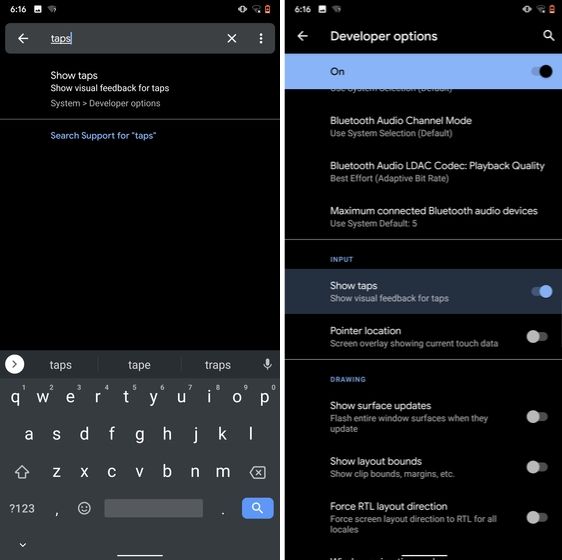
With the release of Android Oreo, Google removed the ability to show taps while screen recording for security reasons. However, the settings to configure taps is still available and hidden under the developer options. Just open the Settings page and search for "taps". Open the first result and enable the toggle. Now, you can record your screen with taps and that's really convenient.
11. Show Taps While Screen Recording hidden android features

12. Capitalize Words Quickly

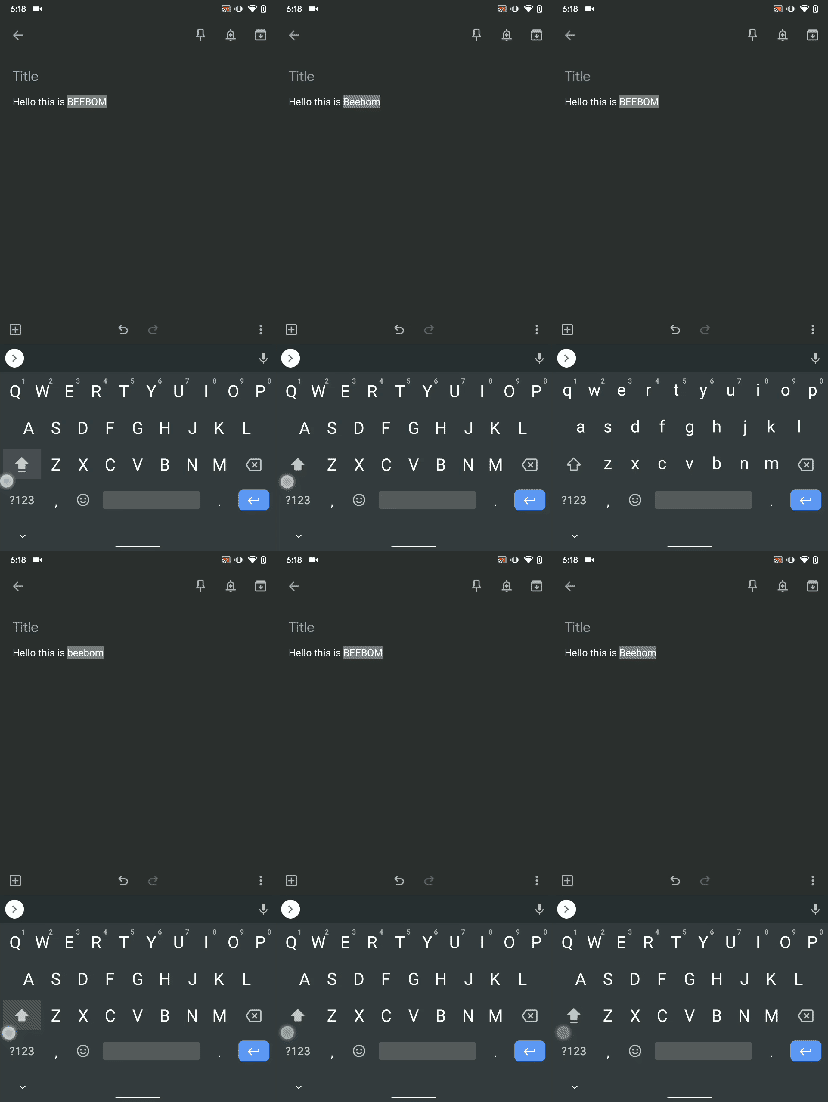
If you want to capitalize words quickly then Gboard has this nifty feature which is super helpful and I simply love it. Just select the words and tap the "Shift" button twice to capitalize a chunk of words at once. You can also make it lowercase by similarly double tapping the shift button. And if you just want to keep the initials capital then tap the shift button once. That's pretty great, right? So go ahead and type hassle-free with Gboard.
Capitalize Words Quickly

13. Uninstall Multiple Apps

One of the best hidden Android features is that you can uninstall multiple apps at once. It works on older versions of Android as well so that is great. All you have to do is open the Google Play Store and tap on the hamburger menu and select "My apps and games". Here, switch to the "Installed" section and then tap on "Storage". After that, simply select apps that you want to uninstall and hit that "Free Up" button. Voila, multiple apps just got uninstalled in just one tap.
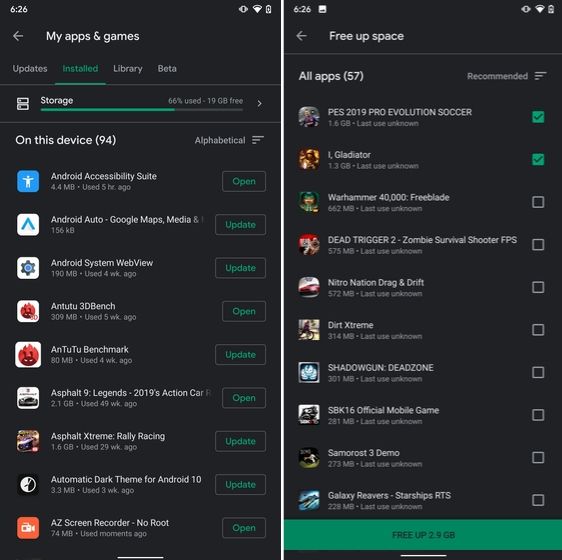
13. Uninstall Multiple Apps

14. Clear Site Storage Using Chrome

Chrome is notorious for accumulating a large amount of data in background which makes the performance worse and also takes up crucial storage space. If you want to check what websites are eating up your memory space then a hidden Chrome setting can help you with that. Open Chrome on your Android device and head over to its Settings page. Now, navigate to Site Settings and open Storage. Here, you will find all the websites with their storage space. Open any website and tap on the "Delete" icon to finally free up your internal storage from unnecessary cached data.
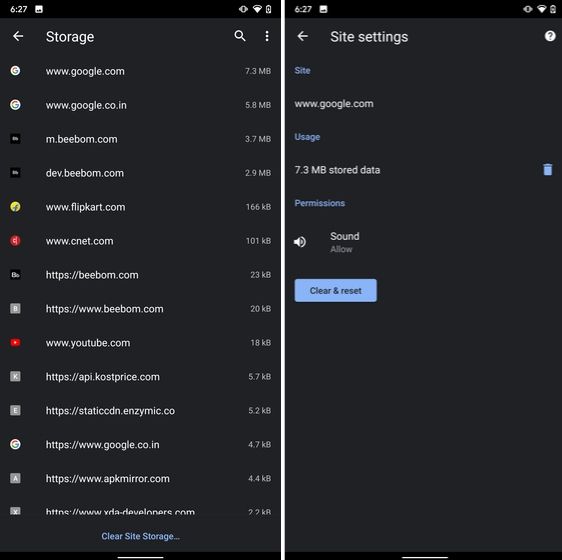
14. Clear Site Storage Using Chrome

15. Street View Layer in Google Maps

Street View is an immersive way to explore places and find new landmarks, hotels, restaurants from anywhere around the world. Now, the Street View Layer has been added to Google Maps and it works pretty well. To check if Street View is available in your region, open Google Maps and tap on the "layer" icon on the top-right corner. Now, tap on "Street View" icon and then zoom out to find blue lines on the map. Finally, tap on the blue lines and Street View will show up for that place. That's cool, right? So go ahead and check out Street View to find some hidden gems around the world.
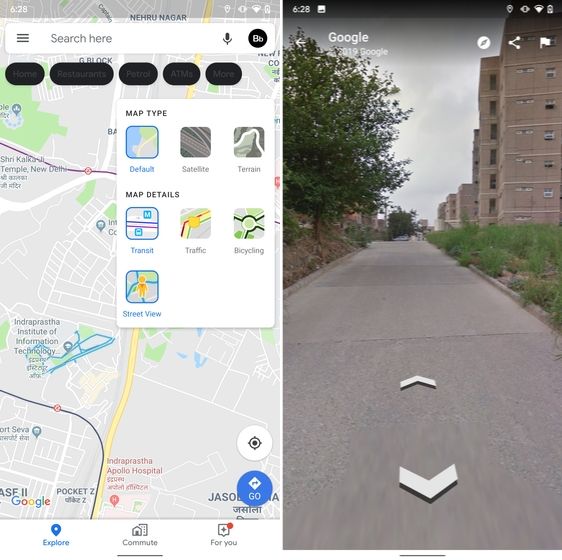
15. Street View Layer in Google Maps hidden android features

Note: The blue lines show up wherever street view is available.

@EVERYTHING NT

Related links

  1. Libros Hacking
  2. Hacking Food
  3. Mindset Hacking Nacho
  4. Libros Hacking

Thursday, May 21, 2020

OWASP Announcement

šŸ•¬  OWASP Announcement:


The OWASP Foundation has been chosen to be 1 of 50 Open Source Organizations to participate in the inaugural year of the Google Season of Docs program.

The goal of Season of Docs is to provide a framework for technical writers and open source projects to work together towards the common goal of improving an open source project's documentation. For technical writers who are new to open source, the program provides an opportunity to gain experience in contributing to open source projects. For technical writers who're already working in open source, the program provides a potentially new way of working together. Season of Docs also gives open source projects an opportunity to engage more of the technical writing community.

We would like to thank the OWASP members that donate their time and knowledge as administrators and mentors. It would not be possible if not for these individuals:
Spyros, Fabio, and Konstantinos 


Related posts
  1. Elladodelmal
  2. Hacking Definition
  3. Hacking Roblox
  4. Como Hacker
  5. Software Hacking
  6. Que Es Un Hacker

Probing For XML Encryption Weaknesses In SAML With EsPReSSO

Security Assertion Markup Language (SAML) is an XML-based standard commonly used in Web Single Sign-On (SSO) [1]. In SAML, the confidentiality of transferred authentication statements against intermediaries can be provided using XML Encryption [2]. However, implementing XML Encryption in a secure way can be tricky and several attacks on XML Encryption have been identified in the past [3] [4]. Therefore, when auditing a SAML endpoint, one should always consider testing for vulnerabilities in the XML Encryption implementation.

This blog post introduces our latest addition to the SAML Attacker of our BurpSuite extension EsPReSSO: the Encryption Attack tab. The new tab allows for easy manipulation of the encrypted parts within intercepted SAML responses and can, therefore, be used to quickly assess whether the SAML endpoint is vulnerable against certain XML Encryption attacks.


Weaknesses of XML Encryption

Implementations of XML Encryption can be vulnerable to adaptive chosen ciphertext attacks. This is a class of attacks in which the attacker sends a sequence of manipulated ciphertexts to a decryption oracle as a way to gain information about the plaintext content.
Falsely implemented XML Encryption can be broken using:
  • an attack against the CBC-mode decryption (quite similar to a padding oracle attack) [3] or
  • a Bleichenbacher attack against the RSA-PKCS#1 encryption of the session key  [4].
SAML makes use of XML Encryption and its implementations could, therefore, also be vulnerable to these attacks.

XML Encryption in SAML

To support confidential transmission of sensitive data within the SAML Assertion, assertions can be encrypted using XML Encryption. An EncryptedAssertion is shown in the abridged example below.

<EncryptedAssertion>
  <EncryptedData>
    <EncryptionMethod Algorithm="http://www.w3.org/2001/04/xmlenc#aes128-cbc"/>
    <KeyInfo>
      <EncryptedKey>
        <EncryptionMethod Algorithm="http://www.w3.org/2001/04/xmlenc#rsa-1_5"/>
        <CipherData>
          <CipherValue>
            [...]
          </CipherValue>
        </CipherData>
      </EncryptedKey>
    </KeyInfo>
    <CipherData>
        <CipherValue>
          [...]
        </CipherValue>
    </CipherData>
  </EncryptedData>
</EncryptedAssertion>

The EncryptedAssertion contains an EncryptedData element, which in turn is the parent of the EncryptionMethod, KeyInfo, and CipherData elements.  SAML makes use of what is referred to as a hybrid encryption scheme. This is done using a session key which symmetrically encrypts the payload data (the example uses AES-128 in CBC mode), resulting in the ciphertext contained in the EncryptedAssertion/EncryptedData/CipherData/CipherValue child element. The session key itself is encrypted using an asymmetric encryption scheme. In our example, RSA-PKCS#1.5 encryption is used with the public key of the recipient, allowing the contents of the the EncryptedKey child element to be derived from the KeyInfo element. 

Encryption Attacker

Our BurpSuite extension EsPReSSO can help detect vulnerable implementations with the newly integrated Encryption Attacker within EsPReSSO's SAML module.

Once a SAML response which contains an EncryptedAssertion has been intercepted, open the SAML tab, select the Attacks pane, and choose Encryption from the dropdown menu. This works in Burp's Proxy, as well as in the Repeater tool, and is depicted below.
As sketched out above, the symmetric session key is encrypted using the recipient's public key. Since the key is public, anybody can use it to encrypt a selected symmetric key and submit a valid encryption of arbitrary messages to the recipient. This is incredibly helpful because it allows us to produce ciphertexts that decrypt the chosen plaintexts. To accomplish this, one can purposefully send invalidly padded messages, or messages containing invalid XML, as a method to trigger and analyze the different reactions of the decryption endpoint (i.e, turning the endpoint into a decryption oracle). To facilitate these investigations, the new Encryption Attacker makes this process dead simple.
The screenshot above shows the essential interface of the new encryption tab:
At the top, the certificate used to encrypt the symmetric session key can be pasted into the text field. This field will be pre-filled automatically if the intercepted SAML message includes a certificate in the KeyInfo child element of the EncryptedData element. The Update Certificate checkboxes above the text area can be used to include the certificate in the manipulated SAML message.
In the Symmetric Key text field, the hexadecimal value of the symmetric session key can be set. Choose the asymmetric algorithm from the dropdown menu and click Encrypt key -- this will update the corresponding KeyInfo elements of the intercepted SAML message. 

The payload in the text area labeled XML data can now be entered. Any update in the XML data field will also be reflected in the hexadecimal representation of the payload (found on right of the XML data field). Note that this is automatically padded to the blocklength required by the symmetric algorithm selected below. However, the payload and the padding can be manually adjusted in the hex editor field.

Eventually, click the Encrypt content button to generate the encrypted payload. This will apply the changes to the intercepted SAML message, and the manipulated message using Burp's Forward or Go button can now be forwarded, as usual.

Probing for Bleichenbacher Oracles

Bleichenbacher's attack against RSA-PKCS1 v1.5 encryption abuses the malleability of RSA to draw conclusions about the plaintext by multiplying the ciphertext with adaptively chosen values, and observing differences in the received responses. If the (error-) responses differ for valid and invalid PKCS1 v1.5 ciphertexts, Bleichenbachers' algorithm can be used to decrypt the ciphertext without knowing the private key [6].

To determine whether or not a SAML endpoint is vulnerable to Bleichenbacher's Attack, we simply need to check if we can distinguish those responses received when submitting ciphertexts that are decrypted into invalidly formatted PKCS1 v1.5 plaintexts, from the responses we receive when sending ciphertexts that are decrypted into validly formatted plaintexts. 

Recall that PKCS1 v1.5 mandates a certain format of the encrypted plaintext, namely a concatenation of a BlockType 00 02, a randomized PaddingString (PS) that includes no 00 bytes, a 00 (NULL-byte) as delimiter, and the actual plaintext message. The whole sequence should be equal in size to the modulus of the RSA key used. That is, given the byte length k of the RSA modulus and the message length |m|, PS has the length |PS| = k - 3 - |m|. Furthermore, PKCS1 v1.5 demands that |PS| to be at least eight bytes long [5]. 

In SAML, the recipient's public key is usually known because it is published in the metadata, or even included in the EncryptedAssertion. For this reason, we do not need to fiddle around with manipulated ciphertexts. Instead, we simply submit a validly formatted RSA-PKCS1 v1.5 encrypted message and an encrypted message which deciphers into an invalidly formatted plaintext. As an example, assume an RSA public key of 2048 bits which we want to use to encrypt a 16 byte session key `01 02 03 04 05 06 07 08 09 0A 0B 0C 0D 0E 0F 10` (hexadecimal representation). |PS|$ is $2048/8 - 3 - 16 = 237, so a valid PKCS1 v1.5 plaintext, ready to be encrypted using `AA` for all 237 padding bytes, could look like the listing shown below.

00 02 AA AA AA AA AA AA AA AA AA AA AA AA AA AA
AA AA AA AA AA AA AA AA AA AA AA AA AA AA AA AA
AA AA AA AA AA AA AA AA AA AA AA AA AA AA AA 00
01 02 03 04 05 06 07 08 09 0A 0B 0C 0D 0E 0F 10
In the Encryption attack pane of EsPReSSO, ensure that the correct public key certificate has been added to the Certificate field. Insert a valid plaintext, such as the one above, into the Symmetric Key field and select Plain RSA encryption from the Algorithm drop down menu. Click the Encrypt button to compute the RSA transformation and apply the new EncryptedKey element to the intercepted SAML message. Now, submit the message by clicking Burp's Go or Forward button and carefully inspect the response.

Next, repeat the steps outlined above, but this time submit an invalid PKCS1 v1.5 message. For example, consider using an invalid BlockType of `12 34` instead of `00 02`, or replace the `00` delimiter so that the decryptor is unable to determine the actual message after decrypting the ciphertext. If you are able to determine from the recieved responses whether or not the submitted ciphertext decrypted into a valid PKCS1 v1.5 formatted plaintext, chances are high that the decryptor can be used as a Bleichenbacher oracle. Don't forget to take into account the actual XML data, i.e., the assertion encrypted with the new session key; by submitting valid or invalid XML, or by removing signatures from the SAML message or the assertion you may increase your chances of detecting differences in the returned responses.

Probing for Oracles in CBC-Mode Decryption

Another known attack on XML Encryption is aimed at the Cipher Block Chaining (CBC) mode, which can be used with the block ciphers AES or 3DES [2]. The attack is described in detail in this referenced paper [3] and is quite similar to Padding-Oracle attacks on CBC mode; the malleability of CBC mode encryption enables the attacker to perform a bytewise, adaptive manipulation of the ciphertext blocks which are subsequently sent to the decryptor. In most cases, the manipulated ciphertext will not decrypt to valid XML and an error will be returned. Sometimes, however, the plaintext will be parsed as valid XML, in which cases an error is thrown later on at the application layer. The attacker observes the differences in the responses in order to turn the decryptor into a ciphertext validity oracle which can be used to break the encryption.  Due to some particularities of the XML format, this attack can be very efficient, enabling decryption with about 14 requests per byte, and it is even possible to fully automate the process [7].

In order to determine if a particular SAML service provider is vulnerable to this attack, we can avoid the cumbersome ciphertext manipulation, if we are in possession of the decryptor's public key:
In the Encryption Attacker tab of EsPReSSO, add the public key certificate to the Certificate field (if necessary) and insert a symmetric key of your own devising into the  Symmetric Key text field. Select an appropriate RSA encryption method and click the Encrypt button to apply the new EncryptedKey element to the original SAML message. 

An XML message can now be inserted into the XML data text field. Select a CBC mode encryption algorithm and click Encrypt to apply the changes. As in the example above, press Burp's Go or Forward button to send the message and carefully inspect the response. Try sending invalid XML, e.g., by not closing a tag or using the `&` character without a valid entity and keep an eye open for differences in the returned responses. To manipulate the padding, the text field on the right side shows the hexadecimal representation of the plaintext, including the CBC padding. If you send a single block and set the last byte, which indicates the padding length to the blocksize, i.e. 16 or 0x10 for AES, the ciphertext should decrypt into an empty string and is generally considered "valid" XML.

Please refer to the original paper for more details, tips, and tricks for performing the actual attack [3]. 

Summary

The new XML Encryption attacker included in EsPReSSO can help security auditors to quickly assess if a SAML endpoint is vulnerable to known attacks against XML Encryption. To this end, the decryptor's public key is used in order to send suitable test vectors that can be provided in plaintext. Ciphertext manipulation is, therefore, not required. The actual process of decrypting an intercepted SAML message is, however, considered out of scope and not implemented in EsPReSSO.

In case you wonder how XML Encryption can be used in a secure fashion, here are some considerations [6]:
  • Always use an authenticated encryption mode such as AES-GCM instead of the CBC-mode encryption.
  • Using RSA-PKCS1 v1.5 within XML Encryption is particularly difficult to do in a secure manner, and it is recommended to use RSA with Optimal Asymmetric Encryption Padding (OAEP) instead [2].
  • Apply a digital signature over the whole SAML response, and ensure it is properly validated before attempting to decrypt the assertion. This should thwart the attack as a manipulated response can be recognized as such and should be rejected.
----------

Related articles


HOW TO HACK WHATSAPP ACCOUNT? – WHATSAPP HACK

In the last article, I have discussed a method on WhatsApp hack using SpyStealth Premium App. Today I am gonna show you an advanced method to hack WhatsApp account by mac spoofing. It's a bit more complicated than the last method discussed and requires proper attention. It involves the spoofing of the mac address of the target device. Let's move on how to perform the attack.

SO, HOW TO HACK WHATSAPP ACCOUNT?                                                          

STEP TO FOLLOW FOR WHATSAPP HACK

Here I will show you complete tutorial step by step of hacking WhatsApp account. Just understand each step carefully so this WhatsApp hack could work great.
  1. Find out the victim's phone and note down it's Mac address. To get the mac address in Android devices, go to Settings > About Phone > Status > Wifi Mac address. And here you'll see the mac address. Just write it somewhere. We'll use it in the upcoming steps.
  2. As you get the target's mac address, you have to change your phone's mac address with the target's mac address. Perform the steps mentioned in this article on how to spoof mac address in android phones.
  3. Now install WhatsApp on your phone and use victim's number while you're creating an account. It'll send a verification code to victim's phone. Just grab the code and enter it here.
  4. Once you do that, it'll set all and you'll get all chats and messages which victims sends or receives.
This method is really a good one but a little difficult for the non-technical users. Only use this method if you're technical skills and have time to perform every step carefully. Otherwise, you can hack WhatsApp account using Spying app.
If you want to know how to be on the safer edge from WhatsApp hack, you can follow this article how to protect WhatsApp from being hacked.

More articles


Chapter 1To 5 HTML

Contents

 
About
 
................................................................................................................................................................................... 1
 
Chapter 1: Getting started with HTML
 
................................................................................................................ 2
 
Section 1.1: Hello World 2
 
Chapter 2: Doctypes
 
.................................................................................................................................................... 4
 
Section 2.1: Adding the Doctype 4
Section 2.2: HTML 5 Doctype 4
 
Chapter 3: Headings
 
.................................................................................................................................................... 5
 
Section 3.1: Using Headings 5
 
Chapter 4: Paragraphs
 
.............................................................................................................................................. 6
 
Section 4.1: HTML Paragraphs
Chapter 5: Text Formatting
 
.....................................................................................................................................  6
.....................................................................................................................................  7
 
Section 5.1: Highlighting 7
Section 5.2: Bold, Italic, and Underline 7
Section 5.3: Abbreviation 8
Section 5.4: Inserted, Deleted, or Stricken 8
Section 5.5: Superscript and Subscript 8
 
Chapter 1: Getting started with HTML

Version Specification Release Date
1.0 N/A 1994-01-01
2.0 RFC 1866
1995-11-24
3.2 W3C: HTML 3.2 Specification
1997-01-14
4.0 W3C: HTML 4.0 Specification
1998-04-24
4.01 W3C: HTML 4.01 Specification
1999-12-24
5 WHATWG: HTML Living Standard
2014-10-28
5.1 W3C: HTML 5.1 Specification
2016-11-01
Section 1.1: Hello World
Introduction

HTML (Hypertext Markup Language) uses a markup system composed of elements which represent specific content. Markup means that with HTML you declare what is presented to a viewer, not how it is presented. Visual representations are defined by Cascading Style Sheets (CSS) and realized by browsers. Still existing elements that allow for such, like e.g. font, "are entirely obsolete, and must not be used by authors"[1].
HTML is sometimes called a programming language but it has no logic, so is a markup language. HTML tags provide semantic meaning and machine-readability to the content in the page.
An element usually consists of an opening tag (<element_name>), a closing tag (</element_name>), which contain the element's name surrounded by angle brackets, and the content in between:
<element_name>...content...</element_name>

There are some HTML elements that don't have a closing tag or any contents. These are called void elements. Void elements include <img>, <meta>, <link> and <input>.
Element names can be thought of as descriptive keywords for the content they contain, such as video, audio, table, footer.
A HTML page may consist of potentially hundreds of elements which are then read by a web browser, interpreted and rendered into human readable or audible content on the screen.
For this document it is important to note the difference between elements and tags:

Elements: video, audio, table, footer

Tags: <video>, <audio>, <table>, <footer>, </html>, </body>


Element insight

Let's break down a tag...

The <p> tag represents a common paragraph.

Elements commonly have an opening tag and a closing tag. The opening tag contains the element's name in angle brackets (<p>). The closing tag is identical to the opening tag with the addition of a forward slash (/) between the opening bracket and the element's name (</p>).
Content can then go between these two tags: <p>This is a simple paragraph.</p>.
 
Creating a simple page

The following HTML example creates a simple "Hello World" web page.

HTML files can be created using any text editor. The files must be saved with a .html or .htm[2] extension in order to be recognized as HTML files.

Once created, this file can be opened in any web browser.


Simple page break down

These are the tags used in the example:

Tag Meaning
<!DOCTYPE> Defines the HTML version used in the document. In this case it is HTML5.
See the doctypes topic for more information.
Opens the page. No markup should come after the closing tag (</html>). The lang attribute declares
 
<html>


<head>


<meta>
 
the primary language of the page using the ISO language codes (en for English). See the Content Language topic for more information.
Opens the head section, which does not appear in the main browser window but mainly contains information about the HTML document, called metadata. It can also contain imports from external stylesheets and scripts. The closing tag is </head>.
Gives the browser some metadata about the document. The charset attribute declares the character encoding. Modern HTML documents should always use UTF-8, even though it is not a requirement. In HTML, the <meta> tag does not require a closing tag.
See the Meta topic for more information.
 
<title> The title of the page. Text written between this opening and the closing tag (</title>) will be displayed on the tab of the page or in the title bar of the browser.
<body> Opens the part of the document displayed to users, i.e. all the visible or audible content of a page. No content should be added after the closing tag </body>.
<h1> A level 1 heading for the page.
See headings for more information.
<p> Represents a common paragraph of text.

1. ↑ HTML5, 11.2 Non-conforming features
2. ↑ .htm is inherited from the legacy DOS three character file extension limit.
 
Chapter 2: Doctypes

Doctypes - short for 'document type' - help browsers to understand the version of HTML the document is written in for better interpretability. Doctype declarations are not HTML tags and belong at the very top of a document. This topic explains the structure and declaration of various doctypes in HTML.
Section 2.1: Adding the Doctype
The <!DOCTYPE> declaration should always be included at the top of the HTML document, before the <html> tag.

Version ≥ 5

See HTML 5 Doctype for details on the HTML 5 Doctype.


Section 2.2: HTML 5 Doctype
HTML5 is not based on SGML (Standard Generalized Markup Language), and therefore does not require a reference to a DTD (Document Type Definition).
HTML 5 Doctype declaration:

Case Insensitivity

Per the W3.org HTML 5 DOCTYPE Spec:

A DOCTYPE must consist of the following components, in this order:

1. A string that is an ASCII case-insensitive match for the string "<!DOCTYPE".

therefore the following DOCTYPEs are also valid:


This SO article discusses the topic extensively: Uppercase or lowercase doctype?
 
Chapter 3: Headings

HTML provides not only plain paragraph tags, but six separate header tags to indicate headings of various sizes and thicknesses. Enumerated as heading 1 through heading 6, heading 1 has the largest and thickest text while heading 6 is the smallest and thinnest, down to the paragraph level. This topic details proper usage of these tags.
Section 3.1: Using Headings
Headings can be used to describe the topic they precede and they are defined with the <h1> to <h6> tags. Headings support all the global attributes.

<h1> defines the most important heading.
<h6> defines the least important heading.

Defining a heading:

Correct structure matters

Search engines and other user agents usually index page content based on heading elements, for example to create a table of contents, so using the correct structure for headings is important.
In general, an article should have one h1 element for the main title followed by h2 subtitles – going down a layer if necessary. If there are h1 elements on a higher level they shoudn't be used to describe any lower level content.

Example document (extra intendation to illustrate hierarchy):

 
Chapter 4: Paragraphs

Column Column
<p> Defines a paragraph
<br> Inserts a single line break
<pre> Defines pre-formatted text

Paragraphs are the most basic HTML element. This topic explains and demonstrates the usage of the paragraph element in HTML.

Section 4.1: HTML Paragraphs

The HTML <p> element defines a paragraph:


Display-

You cannot be sure how HTML will be displayed.

Large or small screens, and resized windows will create different results.

With HTML, you cannot change the output by adding extra spaces or extra lines in your HTML code. The browser will remove any extra spaces and extra lines when the page is displayed:
 
Chapter 5: Text Formatting

While most HTML tags are used to create elements, HTML also provides in-text formatting tags to apply specific text-related styles to portions of text. This topic includes examples of HTML text formatting such as highlighting, bolding, underlining, subscript, and stricken text

Section 5.1: Highlighting

The <mark> element is new in HTML5 and is used to mark or highlight text in a document "due to its relevance in another context".1

The most common example would be in the results of a search were the user has entered a search query and results are shown highlighting the desired query.


Output:


A common standard formatting is black text on a yellow background, but this can be changed with CSS.

Section 5.2: Bold, Italic, and Underline
Bold Text

To bold text, use the <strong> or <b> tags:


or


What's the difference? Semantics. <strong> is used to indicate that the text is fundamentally or semantically important to the surrounding text, while <b> indicates no such importance and simply represents text that should be bolded.

If you were to use <b> a text-to-speech program would not say the word(s) any differently than any of the other words around it - you are simply drawing attention to them without adding any additional importance. By using
<strong>, though, the same program would want to speak those word(s) with a different tone of voice to convey that the text is important in some way.

Italic Text

To italicize text, use the <em> or <i> tags:

 
or


What's the difference? Semantics. <em> is used to indicate that the text should have extra emphasis that should be stressed, while <i> simply represents text which should be set off from the normal text around it.

For example, if you wanted to stress the action inside a sentence, one might do so by emphasizing it in italics via
<em>: "Would you just submit the edit already?"

But if you were identifying a book or newspaper that you would normally italicize stylistically, you would simply use
<i>: "I was forced to read Romeo and Juliet in high school.

Underlined Text

While the <u> element itself was deprecated in HTMl 4, it was reintroduced with alternate semantic meaning in HTML 5 - to represent an unarticulated, non-textual annotation. You might use such a rendering to indicate misspelled text on the page, or for a Chinese proper name mark.


Section 5.3: Abbreviation

To mark some expression as an abbreviation, use <abbr> tag:


If present, the title attribute is used to present the full description of such abbreviation.

Section 5.4: Inserted, Deleted, or Stricken

To mark text as inserted, use the <ins> tag:


To mark text as deleted, use the <del> tag:


To strike through text, use the <s> tag:


Section 5.5: Superscript and Subscript

To offset text either upward or downward you can use the tags <sup> and <sub>. To create superscript:
 

To create subscript:
 
@EVERYTHINGNT
More info
  1. Clases De Hacker
  2. Car Hacking
  3. Hacking Xbox One
  4. Retos Hacking
  5. Curso Hacking Gratis
  6. Escuela Travel Hacking
  7. Libros Hacking Pdf
  8. Car Hacking
  9. Como Aprender A Ser Hacker
  10. Definicion De Cracker
  11. El Hacker Pelicula

Wednesday, May 20, 2020

DirBuster: Brute Force Web Directories


"DirBuster is a multi threaded java application designed to brute force directories and files names on web/application servers. Often is the case now of what looks like a web server in a state of default installation is actually not, and has pages and applications hidden within. DirBuster attempts to find these. However tools of this nature are often as only good as the directory and file list they come with. A different approach was taken to generating this. The list was generated from scratch, by crawling the Internet and collecting the directory and files that are actually used by developers! DirBuster comes a total of 9 different lists (Further information can be found below), this makes DirBuster extremely effective at finding those hidden files and directories. And if that was not enough DirBuster also has the option to perform a pure brute force, which leaves the hidden directories and files nowhere to hide! If you have the time ;) " read more...

Download: https://sourceforge.net/projects/dirbuster

More info


S2 Dynamic Tracer And Decompiler For Gdb

Decompiling is very useful for understanding srtipped binaries, most dissasemblers like IDA or Hopper have a plugin for decompiling binaries, generating a c like pseudocode.

Static analysis, is very useful in most of cases, specially when the binary is not so big, or when you just have an address where to start to analyze. But some algorithms will be learned in less time by dynamic analysis like tracing or debugging.

In cookiemonsters team, we are working on several tracers with different focus, but all of them mix the concept of tracing and decompiling to generate human-readable traces.

S2 is my tracer & decompiler plugin for gdb, very useful for ctfs.
Some of the features are:

- signed/unsigned detecion
- conditional pseudocode (if)
- syscall resolution
- unroll bucles
- used registers values
- mem states
- strings
- logging


Related links


  1. Hacking Y Seguridad
  2. Python Desde 0 Hasta Hacking - MƔster En Hacking Con Python
  3. Hacker Etico
  4. Hacking 2019
  5. Hacking Games Online
  6. Que Es Un Hacker
  7. Hacking Tutorials
  8. Bluetooth Hacking
  9. Blackhat Hacking
  10. Tecnicas De Hacking
  11. Como Empezar En El Hacking
  12. Hacking 2018
  13. Hacking Ɖtico
  14. Hacking Apps