SecTools.Org: List of 75 security tools based on a 2003 vote by hackers.
The Hacker News: The Hacker News — most trusted and widely-acknowledged online cyber security news magazine with in-depth technical coverage for cybersecurity.
Hakin9: E-magazine offering in-depth looks at both attack and defense techniques and concentrates on difficult technical issues.
KitPloit: Leading source of Security Tools, Hacking Tools, CyberSecurity and Network Security.
Exploit DB: An archive of exploits and vulnerable software by Offensive Security. The site collects exploits from submissions and mailing lists and concentrates them in a single database.
Hacked Gadgets: A resource for DIY project documentation as well as general gadget and technology news.
Packet Storm: Information Security Services, News, Files, Tools, Exploits, Advisories and Whitepapers.
HackRead: HackRead is a News Platform that centers on InfoSec, Cyber Crime, Privacy, Surveillance, and Hacking News with full-scale reviews on Social Media Platforms.
Metasploit: Find security issues, verify vulnerability mitigations & manage security assessments with Metasploit. Get the worlds best penetration testing software now.
o_O, he repasado caracter a caracter y son visualmente iguales, si mirais en un editor hexa vereis que realmente no lo son, lógicamente no se trata de un expedienteX.
La cuestion es que según la fuente que tengais, debajo de la comilla o debajo del ] hay un punto microscópico :)
Esto es como cuando me emparanoie de que gmail cuando llevas un rato escribiendo un email y se hace auto-save, aparece una especie de acento raro en la pantalla :)
En estos casos, la metodología tipica de copypastear un trozo de la primera sentencia con el resto de la segunda sentencia, te lleva a los 2 caracteres que varían, pero no aprecias (segun la fuente que tengas) la diferéncia.
Son dígitos unicode, sabe Dios de que pais, y sabe Dios también como los escribí con mi teclado, se me ocurren bromas de código fuente que se pueden hacer con esto :D, pero vamos, si tenemos metodología de reaccién ante expedientesX, sobretodo aquello de divide y vencerás dicotómico, en pocos minutos se resuelven este tipo de problemas.More articles
What is BurpSuite? Burp Suite is a Java based Web Penetration Testing framework. It has become an industry standard suite of tools used by information security professionals. Burp Suite helps you identify vulnerabilities and verify attack vectors that are affecting web applications. Because of its popularity and breadth as well as depth of features, we have created this useful page as a collection of Burp Suite knowledge and information.
In its simplest form, Burp Suite can be classified as an Interception Proxy. While browsing their target application, a penetration tester can configure their internet browser to route traffic through the Burp Suite proxy server. Burp Suite then acts as a (sort of) Man In The Middle by capturing and analyzing each request to and from the target web application so that they can be analyzed.
Everyone has their favorite security tools, but when it comes to mobile and web applications I've always found myself looking BurpSuite . It always seems to have everything I need and for folks just getting started with web application testing it can be a challenge putting all of the pieces together. I'm just going to go through the installation to paint a good picture of how to get it up quickly.
BurpSuite is freely available with everything you need to get started and when you're ready to cut the leash, the professional version has some handy tools that can make the whole process a little bit easier. I'll also go through how to install FoxyProxy which makes it much easier to change your proxy setup, but we'll get into that a little later.
Requirements and assumptions:
Mozilla Firefox 3.1 or Later Knowledge of Firefox Add-ons and installation The Java Runtime Environment installed
Download BurpSuite from http://portswigger.net/burp/download.htmland make a note of where you save it.
on for Firefox from https://addons.mozilla.org/en-US/firefox/addon/foxyproxy-standard/
If this is your first time running the JAR file, it may take a minute or two to load, so be patient and wait.
Video for setup and installation.
You need to install compatible version of java , So that you can run BurpSuite.
A step by step lab based mini course on analyzing your car network
I wanted to learn about hacking cars. As usual I searched around the internet and didn't find any comprehensive resources on how to do this, just bits and pieces of the same info over and over which is frustrating. I am not a car hacking expert, I just like to hack stuff. This mini course will run in a fully simulated lab environment available from open garages, which means in 5 minutes from now you can follow along and hack cars without ever bricking your girlfriends car. Since you obviously wouldn't attack your own Lambo, totally use your girlfriends Prius.
Below are the topics covered in this blogseries so you can decide if you want to read further:
Whats covered in this car hacking mini course:
Setting up Virtual Environments for testing
Sniffing CAN Traffic
Parsing CAN Traffic
Reverse Engineering CAN IDs
Denial of service attacks
Replaying/Injecting Traffic
Coding your own CAN Socket Tools in python
Targeted attacks against your cars components
Transitioning this to attacking a real car with hardware
The first thing we are going to do before we get into any car hacking specifics such as "WTF is CAN?", is get your lab up and running. We are going to run a simple simulated CAN Bus network which controls various features of your simulated car. Its better to learn by doing then sit here and recite a bunch of car network lingo at you and hope you remember it.
I also don't want you to buy a bunch of hardware and jack into your real car right away. Instead there are options that can get you started hacking cars RIGHT NOW by following along with this tutorial. This will also serve to take away the fear of hacking your actual car by understanding what your doing first.
Video Playlist:
Setting up your Lab:
First things first, set yourself up with an Ubuntu VMware install, and load it up. Optionally you could use a Kali Iinux VM, however, that thing drives me nuts with copy paste issues and I think Kayak was giving me install problems. So support is on you if you would like to use Kali. However, I do know Kali will work fine with OpenGarages virtual car.. So feel free to use it for that if you have it handy and want to get started right away.
Install PreReq Libraries:
Once you load this up you are going to want to install CAN utilities and pre-requisite libraries. This is really easy to do with the following Apt-get commands:
Once this is done we can startup the simulator by changing directories to the downloaded repo and running the following 2 commands, which will setup a virtual CAN interface and a simulator GUI Cluster:
Run the setup Script to get the vcan0 interface up:
root@kali:~/ICSim# ./setup_vcan.sh
root@kali:~/ICSim# ./icsim vcan0
On a new terminal tab we will open up our simulators controller with the following command,
root@kali:~/ICSim#./controls vcan0
Note: that the controller must be the in-focus GUI screen to send keyboard commands to the simulator.
How to Use the Simulator:
The simulator has a speedometer with Right and Left turn signals, doors etc. Below are the list of commands to control the simulator when the Control panel is in focus. Give them each a try and note the changes to the simulator.
Up and Down keys control the gauges clusters speedometer
Left and Right keys Control the Blinkers
Right Shift + X, A or B open doors
Left Shift + X, A or be Close doors
Try a few of the above commands for example Right Shift +X and you will see the interface change like so, notice the open door graphic:
Awesome, thanks to OpenGarages you now you have your very own car to hack
Notice in the setup commands above we used a VCan0 interface. Run Ifconfig and you will now see that you indeed have a new network interface that speaks to the CAN network over VCan0.
ficti0n@ubuntu:~/Desktop/ICSim$ ifconfig vcan0
vcan0 Link encap:UNSPECHWaddr 00-00-00-00-00-00-00-00-00-00-00-00-00-00-00-00
Car networks run on a variety of protocols most prevalent being CAN. You can think of a CAN Bus like an old school networking hub where everyone can see everyone elses traffic. This is true to some extent although you may not see all of the cars traffic if its not connected to that particular bus your plugged into. You can think of CAN traffic kind of like UDP in that its send and forget, the main difference being parts of the CAN bus network don't actually have addresses and everything runs off arbitration IDs and priorities. Thats enough background to get you doing rather then reading.
With a little knowledge out of the way lets check if we can see our CAN traffic from our virtual car via the CanDump utility, which you installed as part of CanUtils package above. Using the following command on the vcan0 interface our simulator uses you can view a stream of traffic:
ficti0n@ubuntu:~/Desktop/ICSim$ candump vcan0
Above we can see a bunch of CAN frames, and if we perform actions on the vehicle we will see changes to data values in the CanDump output.However this may happen very fast, and we may not be able to see if for example we unlocked our simulators door. This is because things are changing constantly in the cars IDLE state. One single value changing may not stand out enough for us to take notice or may scroll so fast we cant see it.
Capture and Replay CAN Actions:
One option would be to perform an action and replay it, we should see the actions happen again in the replay if the traffic for the action we recorded is on the same bus network our device is plugged into. There are loads of networks within a car and its not guaranteed our network tap for example an OBD2 port plugin is connected to the same network as door we opened.Or the door may not be connected to the network at all depending on your car and its age or how its configured.
Replaying dumps with CanPlayer:
Another useful tool included with CanUtils package is CanPlayer for replaying traffic. If the functionality we are trying to capture is on the same Bus as the adaptor plugged into the car, or in this case our Virtual CAN interface, we can use CanDump to save traffic to a file. We then use CanPlayer to replay the traffic on the network. For example lets run CanDump and open a door and then replay the functionality with CanPlayer.
Lab 1 Steps:
Run CanDump
Right Shift + X to open a door
Cancel CanDump (ctrl+c)
Left Shift + X to close the door
Run can player with the saved dump and it will replay the traffic and open the door
Recording the door opening:(-l for logging)
ficti0n@ubuntu:~/Desktop/ICSim$ candump -l vcan0
Replaying the CanDump file:(use the file your can dump created)
Nice, so if all went well you should see that your door is now open again. If this did not happen when attacking a real car, just try to replay it again. CAN networks are not like TCP/IP, they are more like UDP in that you send out your request and its not expecting a response. So if it gets lost then it gets lost and you have to resend. Perhaps something with higher priority on the network was sending at the time of your replay and your traffic was overshadowed by it.
Interacting with the Can Bus and Reversing Traffic:
So thats cool, but what about actually understanding what is going on with this traffic, CanDump is not very useful for this, is scrolls by to quickly for us to learn much from.Instead we can use CanSniffer with colorized output to show us the bytes within packets that change. Below is an example of CanSniffer Traffic:
You will see 3 fields, Time, IDand Data. Its pretty easy to figure out what these are based on thier name. The most important part for our usage in this blog are the ID and the Data fields.
The ID field is the frame ID which is loosely associated with the device on the network which is effected by the frame being sent. The ID to also determines the priority of the frame on the network.The lower the number of the CAN-ID the higher priority it has on the network and more likely it will be handled first.The data field is the data being sent to change some parameter like unlocking a door or updating output. You will notice that some of the bytes are highlighted RED. The values in red are the values that are changing during the idle state you are currently in.
Determine which ID and Byte controls the throttle:
So with the terminal sniffing window open put the simulator and the controller into the foreground, with the controller being the window you have clicked and selected.Pay attention to the CanSniffer output while hitting the UP ARROW and look for a value that was white but is now Red and increasing in value as the throttle goes up.This might take you a few minutes of paying attention to whats going on to see.
The following 2 pictures show ID 244 in the IDLE state followed by pressing the up button to increase the speed. You will notice a byte has turned red and is increasing in value through a range of HEX values 0-F. It will continue to enumerate through values till it reaches its max speed.
The byte in ID 244 which is changing is the value while the throttle is engaged, so 244 associated in some way with the increasing speed. The throttle speed is a good value to start with as it keeps increasing its value when pressed making it easier to spot while viewing the CanSniffer output.
Singling out Values with Filters:
If you would like to single out the throttle value then click the terminal window and press -000000 followed by the Enter key which will clear out all of the values scrolling. Then press +244 followed by the Enter key which will add back the throttle ID. You can now click the controller again and increase the speed with your Up arrow button without all the noise clouding your view.You will instead as shown below only have ID 244 in your output:
To get back all of the IDs again click the terminal window and input +000000 followed by the Enter key. Now you should see all of the output as before.Essentially 000000 means include everything. But when you put a minus in front of it then it negates everything and clears your terminal window filtering out all values.
Determine Blinker ID:
Now lets figure out another ID for the blinkers. If you hit the left or right arrow with the controls window selected you will notice a whole new ID appears in the list, ID 188 shown in the picture below which is associated with the blinker.
This ID was not listed before as it was not in use within the data output until you pressed the blinker control.Lets single this value out by pressing -000000 followed by +188. Just like in the throttle example your terminal should only show ID 188, initially it will show with 00 byte values.
As you press the left and the right blinker you will see the first Byte change from 00 to 01 or 02. If neither is pressed as in the screenshot above it will be 00. Its kind of hard to have the controller in focus and get a screenshot at the same time but the ID will remain visible as 00 until it times out and disappears from the list when not active. However with it filtered out as above you can get a better view of things and it wont disappear.
Time for YOU to do some Protocol Reversing:
This lab will give you a good idea how to reverse all of the functionality of the car and associate each action with the proper ID and BYTE. This way you can create a map of intended functionality changes you wish to make.Above we have done a few walk throughs with you on how to determine which byte and ID is associated with an action. Now its time to map everything out yourself with all the remaining functionality before moving on to attacking individual components.
Lab Work Suggestion:
Take out a piece of paper and a pencil
Try unlocking and locking doors and write down the ID which controls this action (remember your filters)
Try unlocking each door and write down the BYTES needed for each door to open
Try locking each doors and what Bytes change and what are their values, write them down
Do the same thing for the blinkers left and right (Might be different then what I did above)
What ID is the speedometer using?What byte changes the speed?
Attacking Functionality Directly:
With all of the functionality mapped out we can now try to target various devices in the network directly without interacting with the controllers GUI. Maybe we broke into the car via cellular OnStar connectionor the center console units BLE connection which was connected to the CAN network in some way. After an exploit we have direct access to the CAN network and we would like to perform actions. Or maybe you have installed a wireless device into an OBD2 port under the dashboard you have remote access to the automobile.
Using the data from the CAN network reversing lab above we can call these actions directly with the proper CAN-ID and Byte.Since we are remote to the target we can't just reach over and grab the steering wheel or hit the throttle we will instead send your CAN frame to make the change.
One way we can do this is via the CanSend utility. Lets take our information from our lab above and make the left turn signal flash with the following ID 188 for the turn signal by changing the first byte to 01 indicating the left signal is pressed. CanSend uses the format ID#Data. You will see this below when sending the turn signal via CanSend.
You should have noticed that the left signal flashed. If not pay more attention and give it another try or make sure you used the correct ID and changed the correct byte.So lets do the same thing with the throttle and try to set the speed to something with ID 244 that we determined was the throttle.
My guess is that nothing happened because its so fast the needle is not going to jump to that value. So instead lets try repeating this over and over again with a bash loop which simply says that while True keep sending the throttle value of 11 which equates to about 30mph:
ficti0n@ubuntu:~/Desktop/ICSim$ while true; do cansend vcan0 244#00000011F6;done
Yes thats much better, you may notice the needle jumping back and forth a bit. The reason the needle is bouncing back and forth is because the normal CAN traffic is sent telling the car its actually set to 00 in between your frames saying its 30mph.But it worked and you have now changed the speed the car sees and you have flashed the blinker without using the cars normal blinker controls. Pretty cool right?
Monitor the CAN Bus and react to it:
Another way to handle this issue is to monitor the CAN network and when it sees an ID sent it will automatically send the corresponding ID with a different value.. Lets give that a try to modify our speed output by monitoring for changes. Below we are simply running CanDump and parsing for ID 244 in the log output which is the throttle value that tells the car the speed. When a device in the car reports ID 244 and its value we will immediately resend our own value saying the speed is 30mph with the value 11.See below command and try this out.
ficti0n@ubuntu:~/Desktop/ICSim$ candump vcan0 | grep " 244 " | while read line; do cansend vcan0 244#00000011F6; done
With this running after a few seconds you will see the speed adjust to around 30MPH once it captures a legitimate CAN-ID 244 from the network traffic and sends its own value right after.
Ok cool, so now while the above command is still running click the controller window and start holding down the Up arrow with the controller in focus.. After a few seconds or so when the speed gets above 30MPH you will see the needle fighting for the real higher value and adjusting back to 30MPH as your command keeps sending its on value as a replacement to the real speed.
So thats one way of monitoring the network and reacting to what you see in a very crude manner.Maybe someone stole your car and you want to monitor for an open door and if they try to open the door it immediately locks them in.
Conclusion and whats next:
I am not an expert car hacker but I hope you enjoyed this. Thats about as far as I want to go into this subject today, in the next blog we will get into how to code python to perform actions on the CAN network to manipulate things in a similar way.With your own code you are not limited to the functionality of the tools you are provided and can do whatever you want. This is much more powerful then just using the CanUtils pre defined tools. Later on I will also get into the hardware side of things if you would like to try this on a real car where things are more complicated and things can go wrong.
How To Recover Files That Are Deleted From Recycle Bin
How To Recover Files That Are Deleted From Recycle Bin
Well, Windows users have a bad habit of removing files from recycle bin. Deleting useless files from Recycle Bin helps a user to save some storage space which can improve the speed of a computer. However, Windows users do that more frequently and later regret. Actually, Recycle Bin is a place from where we can get back our deleted files and folders.
Sometimes, we accidentally delete our important files and folders and due to some reason we lose them from Recycle bin too! At that time, we search for recovery methods. Well, there are many methods available over the web which can help you to recover deleted files from computer, but, when it comes to reliability, nothing can beat EaseUS.
What Is EaseUS Data Recovery Wizard?
EaseUS is one of the leading software providers which is known for its data recovery programme. EaseUS offers some free data recovery software that can help you to recover deleted, formatted or lost data from PC, laptop or removable device easily and quickly.
One of the best thing about EaseUS is that it provides tools for recycle bin recovery which can help you to get back files that you have deleted from the Recycle bin itself. EaseUS Data Recovery Wizard free can easily recover lost files, pictures, documents, videos and more from deleting, formatting, partition loss, OS crash, virus attack and other data loss cases.
How To Recover Deleted Files?
If you are struggling to get back your lost data files, then here is an easy data recovery method which will help you to get back deleted files on your computer. Below, we are going to share a mini guide on how to use EaseUS Recycle Bin Recovery to get back your deleted data.
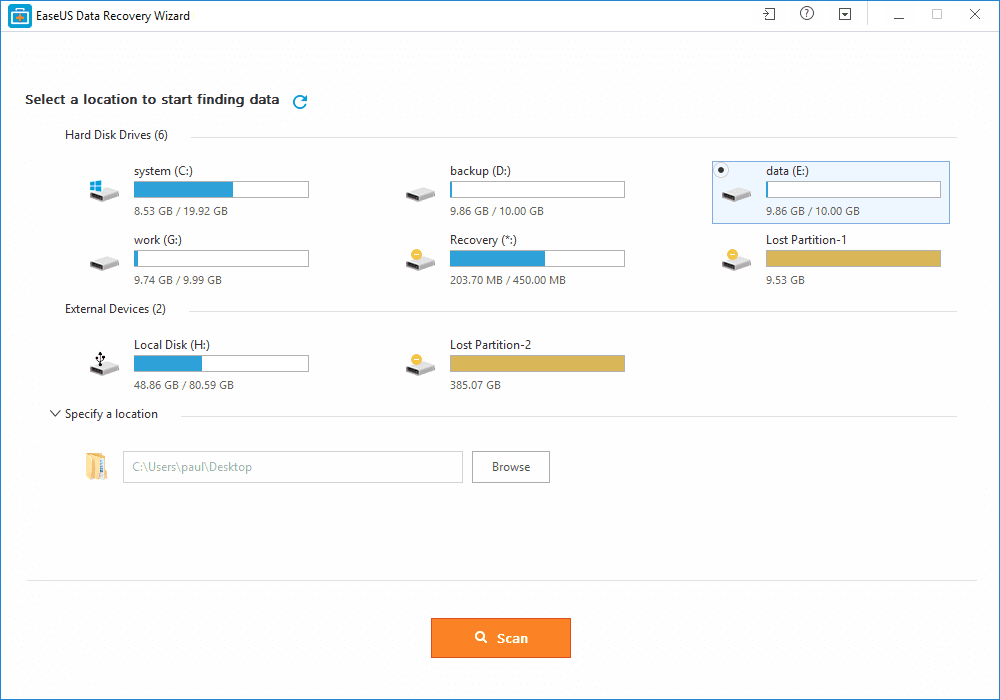
Step 1. First of all, you need to download and install EaseUS Data Recovery Wizard on your Windows computer and then launch it normally. You need to select the location where you want to scan and then click on 'Scan'
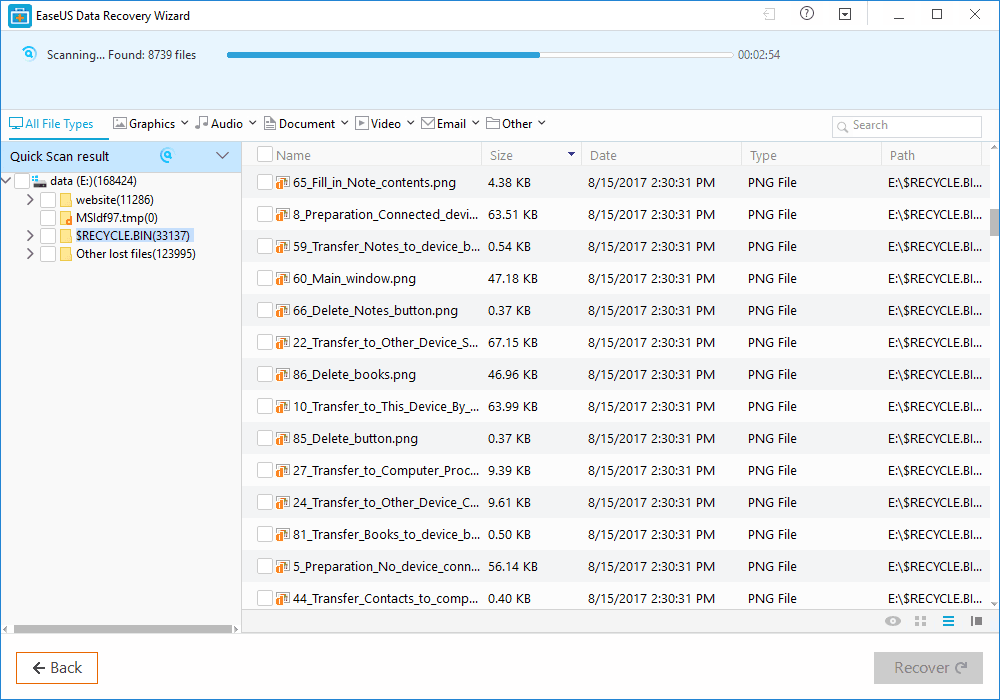
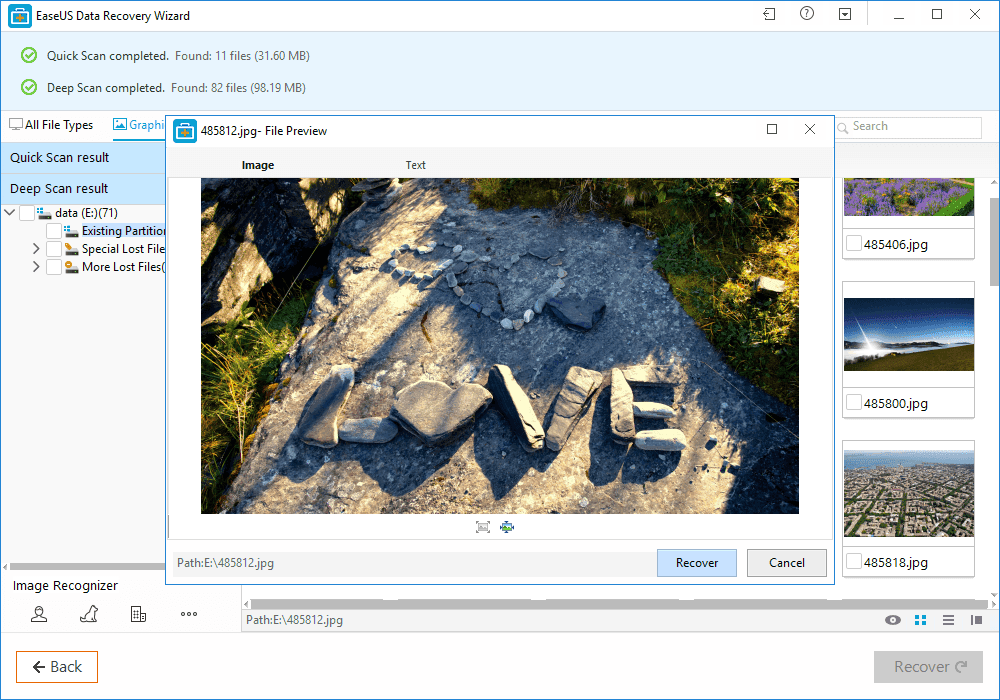
Step 2. Now, wait for few minutes until the tool finishes scanning your drive. The tool search for files that got deleted or cleaned from the Recycle Bin.
Step 3. Now it will show you files that you can recover. Here you need to click on the file which you want to recover and click on 'Recover'
That's it, you are done! This is how you can use EaseUS data recovery to get back your deleted files on your computer.
Benefits of EaseUS Data Recovery
Well, the data recovery tool provided by EaseUS comes with many benefits. It can not only recover accidentally deleted files, but it can also recover data in case of Virus Attacks, Hard Disk Damage, OS Crash etc.
You can also use this awesome data recovery wizard to recover deleted files from External Disk, USB Drive, Camcorder, Mobile Devices, Zip Drive, iPod, Music Player and more.
Overall, this is one of the best data recovery tools you can have on your Windows computer. EaseUS Data Recovery also has a free version with restricted features. Overall, this is a stress-free solution to get back your deleted files


.jpg)